

Set up email on Android in Outlook – Guide for your bluetronix account
On this page, you will find a step-by-step guide to setting up your bluetronix email account on an Android device. You will receive all the necessary information for incoming and outgoing server (IMAP/SMTP), username and password, as well as tips for verification and troubleshooting – so your emails can be reliably sent and received.
Install Outlook app
If the Outlook app is not yet installed on your Android device, first download and install it from the Google Play Store.
You can find the download here: Outlook app in Google Play Store
Find email data
If you have not set up an email address yet, first complete the step Create email address.
Open your bluetronix homepage in edit mode.
Go to Email ⯈ Email address management.
Click on Access data for the desired address.
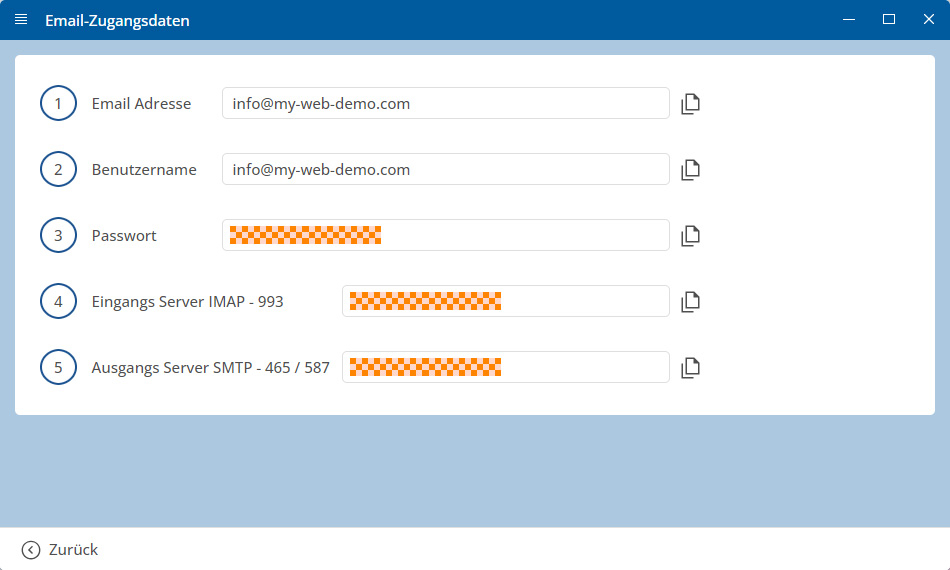
Important: Enter all data exactly as specified in the access data. Also pay attention to capitalization.
Android: Set up account in Outlook
Open the Outlook app on your Android device.
If you are opening Outlook for the first time, tap Get Started.
If another account is already set up in Outlook, open the Menu in the top left corner or tap on your profile picture.
Outlook app with the start view and menu or profile picture to open account management.
Then go to Settings at the bottom left.
Outlook app with the selected button "Settings".
Tap on Accounts.
Outlook app with the opened section "Accounts".
Tap on Add Account.
Outlook app with the button "Add Account".
Tap on Add Email Account.
Outlook app with the option "Add Email Account".
Enter your full email address and tap Next.
Outlook app with the input field for the email address and button "Next".
Select IMAP when prompted for account type.
Outlook app with the selection of the account type "IMAP".
Then enable Advanced Settings.
Now enter the details for the Incoming Mail:
• IMAP server / hostname
• Port
• Security type / encryption
• Username
• Password
Then enter the details for the Outgoing Mail:
• SMTP server / hostname
• Port
• Security type / encryption
• Username
• Password
Carefully check all entries and complete the setup by clicking the checkmark at the top right.
Outlook app with advanced settings for IMAP and SMTP as well as a checkmark to complete the setup.
Note: When setting up via IMAP, only your emails are usually synchronized in Outlook on Android. Contacts and calendars are typically not transferred.
Test emails
First, send an email to your own address and check if the message arrives in your inbox.
Then test sending to another address to make sure that both Receiving and Sending work.
If issues arise: Check settings
Check inbox (IMAP)
In Outlook, open the Menu or your Profile Picture, go to Settings, and select your configured account.
Particularly check the information for IMAP server, Port, Username, and Encryption.
Pay special attention to ensure that the IMAP server has been entered exactly as provided, and that the values for Port and Encryption in your credentials are entered correctly.
Check outgoing mail (SMTP)
Check all details for SMTP server, port, username, password, and encryption for outgoing mail.
If receiving works but sending does not, the error is usually in the SMTP data or an incorrectly entered port.
Add new account
If the setup does not work despite correct data, remove the account from the Outlook app and add it again.
If Outlook automatically assigns the address to the wrong provider, set up the account again and this time manually select IMAP.
Setup completed
If the test message is successfully received and sending and receiving work, the setup is complete.
FAQ
what customers often ask us
IMAP or POP3 – which one should I use?
IMAP is recommended to keep emails and folders synchronized in the Outlook app and on other devices. POP3 usually downloads emails locally and is only useful in special cases.
Where can I find my access data (server, ports, username, password)?
Open your bluetronix homepage in editing mode: Email ⯈ Email Address Management. Click on Access Data for the desired address. Pay attention to the exact case.
What ports and encryption do I need?
IMAP: Port 993 with SSL/TLS.
SMTP: Port 587 or 465, depending on the credentials, with SSL/TLS or the specified encryption and active authentication: password.
How can I quickly test if everything works?
Send yourself an email. If it arrives in the inbox and also appears under sent, everything is set up correctly.
Troubleshooting – common causes
Check server names, ports, SSL/TLS, authentication: password, username (usually the full email address), and your password. If receiving works but sending does not, the error is usually in the SMTP data or the wrong port.
How do I start the setup in Outlook?
Open the Outlook app and go to Profile picture ⯈ Settings ⯈ Add account ⯈ Add email account. Enter your email address and tap Next.
How do I set up the account manually?
If Outlook does not automatically recognize the provider, select IMAP or POP3 and enable Advanced settings. Then enter all server data exactly as per your credentials.
Configure incoming and outgoing servers.
Incoming emails: IMAP server / hostname, port, encryption, username, password.
Outgoing emails (SMTP): SMTP server / hostname, port, encryption, username, password.
How do I enter ports in Outlook?
If Outlook does not display a separate port field, enter the port directly after the server name, for example, imap.yourserver.com:993 or smtp.yourserver.com:587.
Check settings later.
Open Profile picture ⯈ Settings in the Outlook app and select your configured account. Compare all details for IMAP, SMTP, port, username, and encryption with your credentials.
Common errors.
Common causes include incorrect ports, disabled encryption, typos in hostname, username or password, and incorrect choice of IMAP instead of POP3 or vice versa. If necessary, remove the account in Outlook and set it up again.